
Web → n8n → Ollama → Result
I Built a 24/7 AI Automation Server for $150 — Here’s My Raspberry Pi 5 + NVMe Setup
Running AI automations on my laptop was getting old.
Every time I closed it to go somewhere, my workflows stopped. My email analyzer quit working. My content research pipeline froze. Everything I’d automated just… paused until I opened my laptop again.
Plus, my laptop fan sounded like a jet engine whenever Ollama was processing. Not exactly subtle when you’re trying to work at a coffee shop.
I needed something that could run 24/7. Something quiet. Something cheap enough that I wouldn’t feel guilty leaving it on all month. Something I could actually afford as a guy in his 20s building from zero.
Enter the Raspberry Pi 5.
For ~$150 total (Pi + NVMe storage + accessories), I built a dedicated AI automation server that runs silently in the corner of my room, handling all my workflows around the clock. No cloud subscriptions. No laptop battery drain. Complete control.
This isn’t a sponsored post. I paid for everything myself. And honestly? Some parts were frustrating as hell to set up. But that resistance is where I learned how this stuff actually works—not just copy-pasting commands and hoping.
Think of this as your spotter helping you build your own always-on automation infrastructure. I’ll show you what I did, what broke, how I fixed it, and whether it’s actually worth it.
Let’s build something that runs while you sleep.
What This Can Actually Do
Right now, this $150 box is:
- Auto-summarizing my daily newsletters.
- Running a local ‘research assistant’ that doesn’t send my data to OpenAI.
- Categorizing my bank statements via n8n
| Feature | VPS (Cloud) | Mini PC | Raspberry Pi 5 |
| Upfront Cost | $0 | $300+ | $150 |
| Monthly Cost | $10-$30 | $0 | $0 |
| Privacy | Low (Cloud) | High (Local) | High (Local) |
| Effort | Low | Medium | High (Tinkering) |
Why Raspberry Pi 5 (And Not Other Options)
Options I Considered:
Option 1: VPS (Cloud Server)
Cost: $10–30/month ongoing
The Pros
- No hardware to buy or manage
- Always online — workflows run 24/7 without your laptop being open
- Looks and feels professional from day one
The Cons
- Recurring cost that adds up fast when you’re just starting out
- Someone else’s computer — your data lives on their server
- Privacy concerns depending on what you’re automating
The Verdict
Good for scaling. Not for learning.
A VPS makes sense once you know what you’re building and need it running around the clock. But if you’re still in Phase 1 or 2, still figuring out how workflows actually work you’re paying monthly for infrastructure you don’t need yet.
Learn first. Scale later. The VPS will still be there when you’re ready.
Option 2: Mini PC (Intel NUC, etc.)
Cost: $300–800 one-time
The Pros
- Significantly more powerful than a Raspberry Pi
- Runs almost any local model without breaking a sweat
- Still compact, sits on your desk without taking up space
The Cons
- Expensive upfront for someone still in the learning phases
- Overkill if you’re still building your first ten automations
- Higher power consumption than a Pi, small but real ongoing cost
The Verdict
Maybe later — when you’re actually scaling.
The Mini PC is the right tool eventually. When your automation stack is serious, your workflows are running constantly, and you need reliable local power, this is what you upgrade to.
But right now? You don’t need it yet. Don’t spend $500 on hardware before you’ve proven out your workflows on something cheaper. Build first. Upgrade when the current setup becomes the bottleneck.
That’s the move.
Why the Pi 5 Specifically (Not the Pi 4)
If you’re going the Raspberry Pi route get the 5. Here’s exactly why the upgrade matters.
What Changed With the Pi 5
- 8GB RAM — same ceiling as Pi 4 but the Pi 5 actually uses it efficiently
- Significantly faster CPU — real world difference when running inference
- Better I/O performance — data moves faster between components
- PCIe support for NVMe storage — this is the game changer
- USB 3.0 — faster peripherals, faster data transfer
Why PCIe + NVMe Is a Big Deal
The Pi 4 was bottlenecked by slow SD card storage. The Pi 5 supports NVMe drives through PCIe, meaning your read and write speeds go from sluggish to actually usable for AI workloads.
For running local models that’s not a minor upgrade. It’s the difference between a setup that feels broken and one that actually works.
Can It Run AI Models?
Yes small ones. Think 1B to 3B parameter models running through Ollama. Nothing cutting edge but more than enough to automate real tasks locally.
The Full Breakdown
Cost: ~$150 all-in
Pros:
- Low power consumption — runs cheap 24/7
- Silent — no fans, no noise
- Small — fits anywhere
- You own it completely — no recurring costs
- Perfect for learning without risking expensive hardware
Cons:
- Less powerful than a Mini PC or VPS
- Requires tinkering — not plug and play
- ARM architecture limits which models and tools are compatible
The Verdict
Pi 4 was a hobby device. Pi 5 is a legitimate local AI machine.
For where I am right now – Phase 2, still building and learning, this is the perfect setup. Low cost, low risk, high ownership. When the Pi 5 becomes the bottleneck that’s when I’ll know it’s time to upgrade.
Get the right foundation first. Scale when you’ve outgrown it.
My Decision Framework
Everyone’s setup will look different. Here’s exactly how I made mine.
Where I’m At Right Now
- Month 2-5 of my automation journey
- Running 3+ active workflows
- Need 24/7 uptime — my computer can’t be the server anymore
- Budget is tight — one-time spend only, no monthly bills
- Privacy matters — client data stays off cloud
- Still learning — want to understand server management hands on
Why Pi 5 Hit the Sweet Spot
Every other option had a dealbreaker at my current stage:
- VPS — recurring cost, privacy trade-off, someone else’s machine
- Old laptop — loud, power hungry, not built for this
- Mini PC — powerful but $300-800 is overkill for where I am now
Pi 5 at ~$150 one-time checks every box for Month 2-5 of this journey.
The Simple Test I Used
Three questions before committing:
- Can I justify the cost right now? ✅ One-time $150 — yes
- Does it match my current skill level? ✅ Requires tinkering — that’s the point
- Will it serve me for the next 6-12 months? ✅ Until I outgrow it
The Bottom Line
Don’t buy for where you want to be. Buy for where you actually are.
I’m not scaling an agency yet. I’m building the foundation. The Pi 5 matches that stage perfectly, and when I outgrow it I’ll know exactly why, which means I’ll know exactly what to upgrade to.
That’s the whole decision.
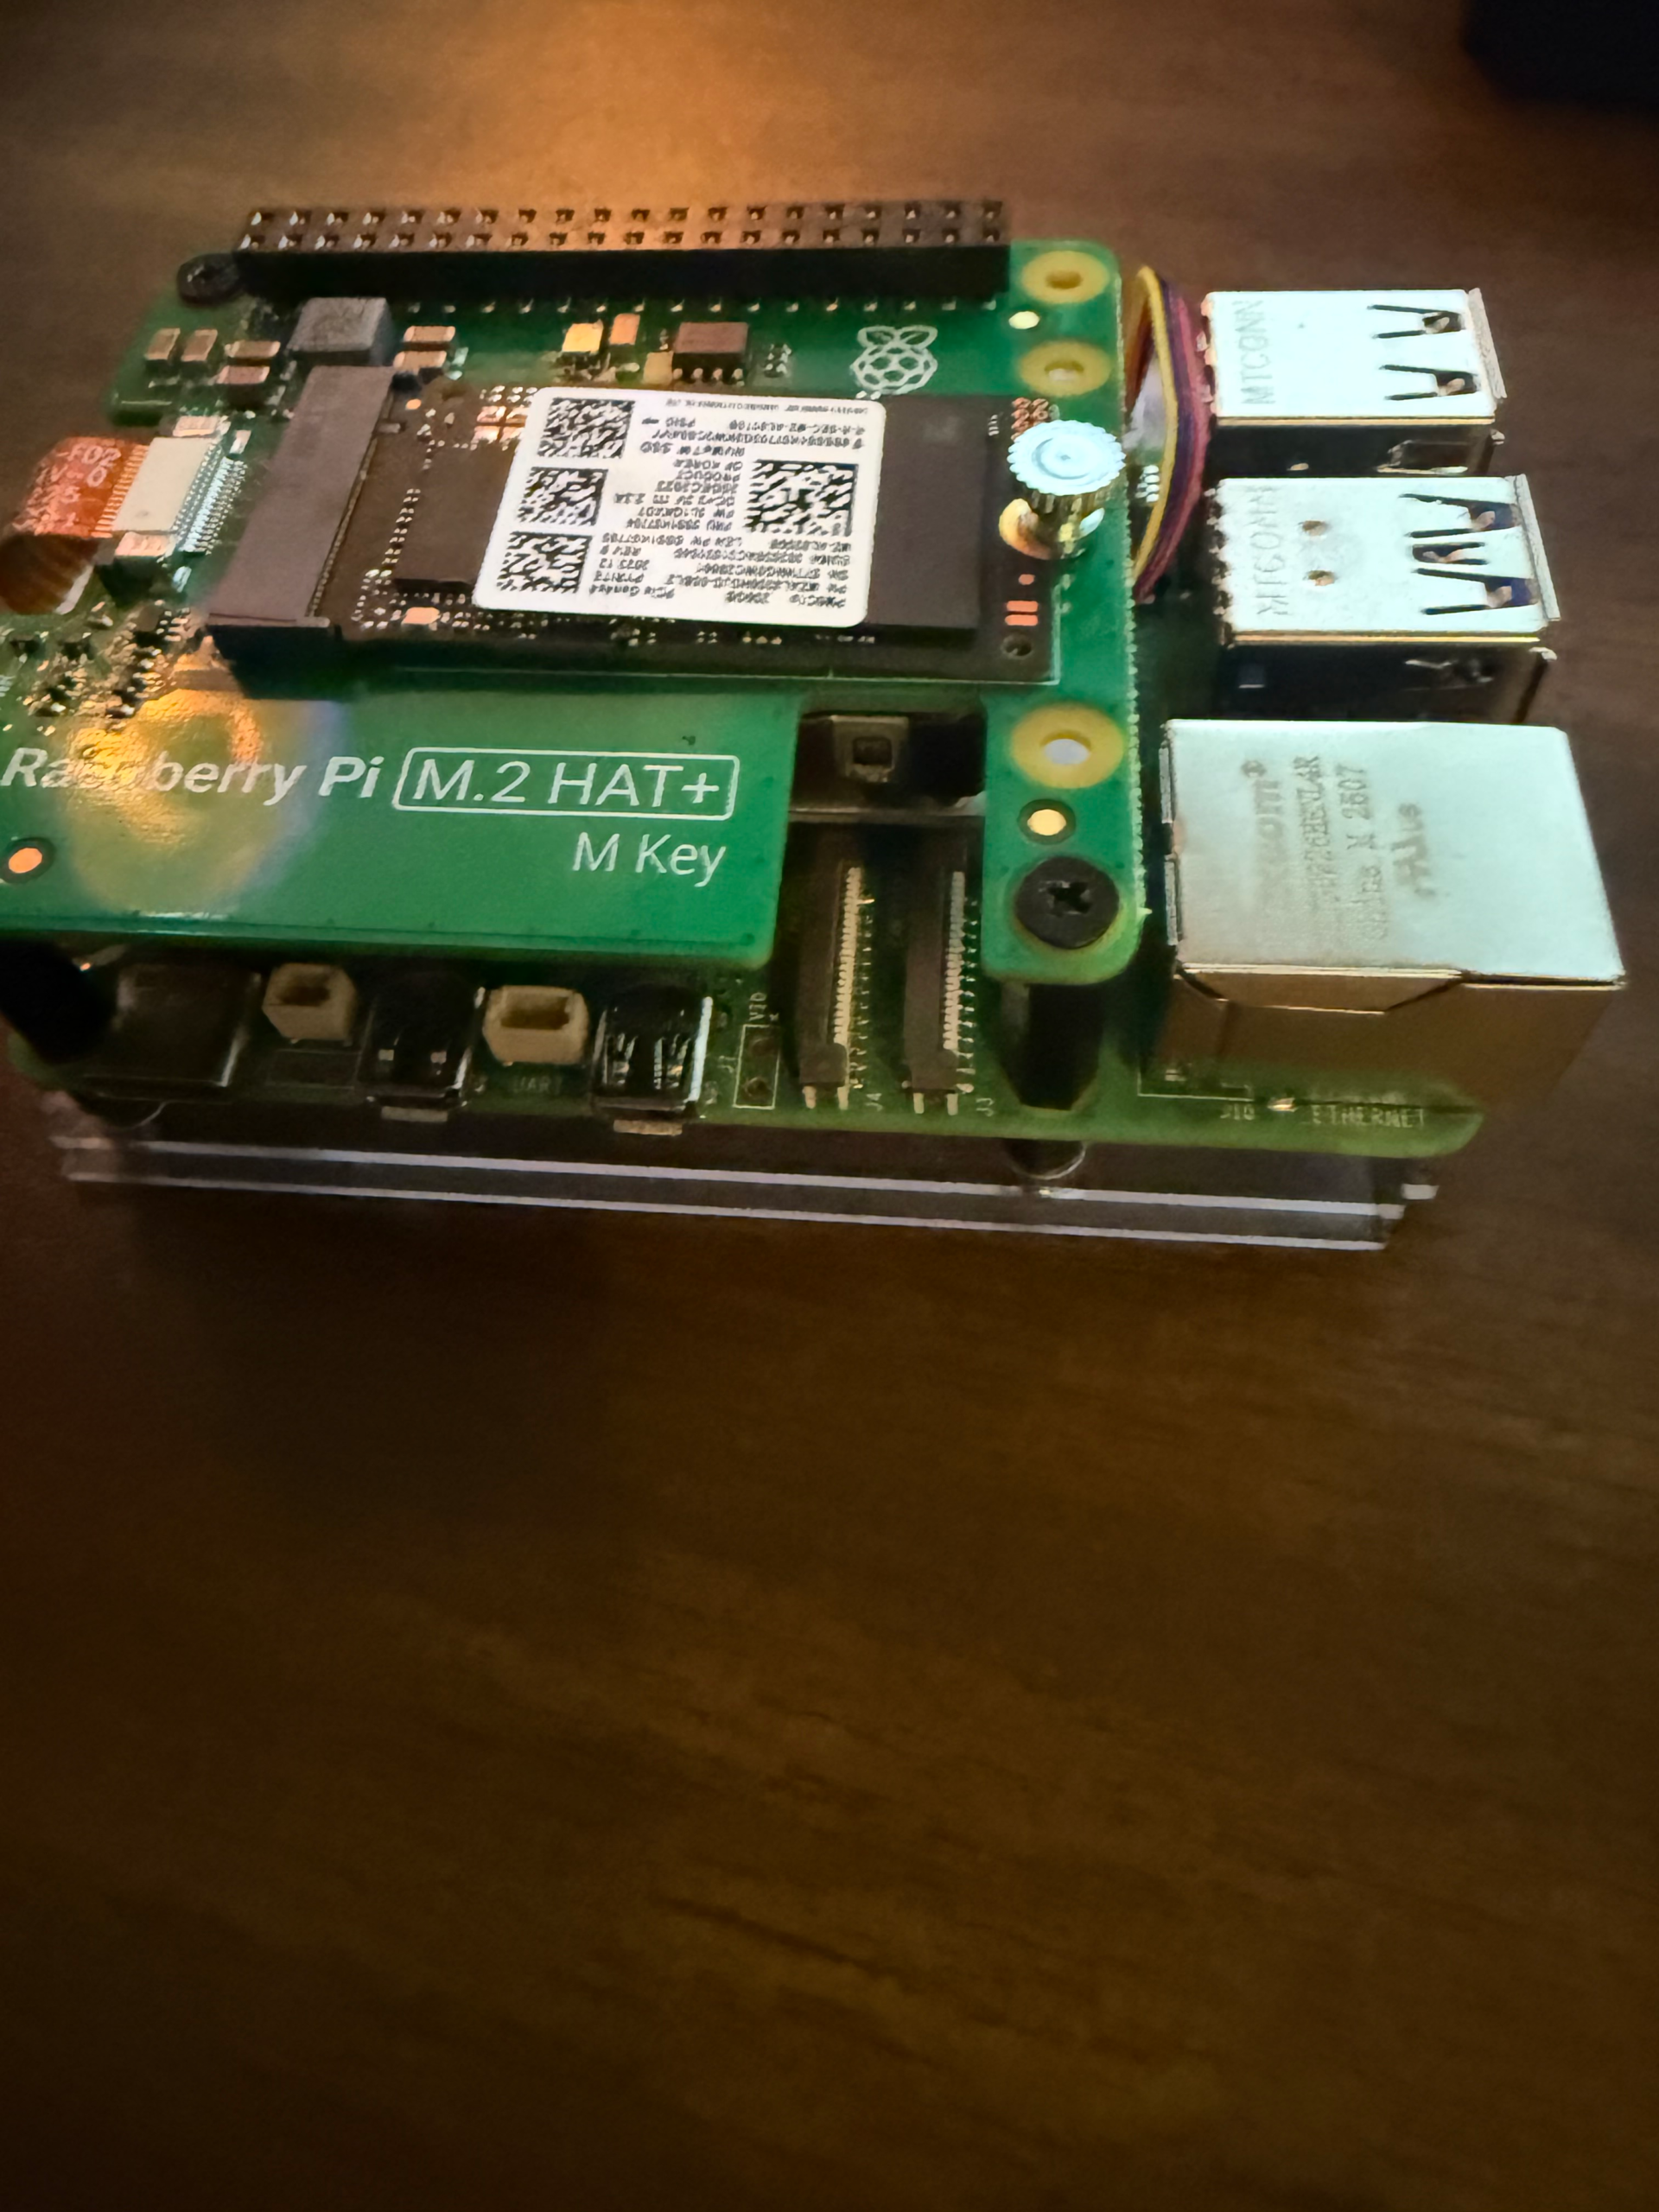
Complete Parts List (What I Actually Bought)
The Core Setup – ~$150 Total:
Raspberry Pi 5 (8GB RAM) – $80
- Got the 8GB model (mandatory for AI work)
- Don’t cheap out and get 4GB—AI models need RAM
- Official Raspberry Pi Foundation
- Where: Official distributors, Adafruit, CanaKit
NVMe SSD (256GB) – $30
- Crucial P3 Plus 256GB M.2 NVMe, I recommend looking for compatibility at pimoroni.com
- Why NVMe: 10x faster than SD card, way more reliable
- 256GB is minimum—I wish I’d gone 512GB
- Where: Amazon, Newegg
NVMe Base for Pi 5 – $15
- Pimoroni NVMe Base (official adapter)
- Mounts NVMe directly under the Pi
- Clean, compact solution
- Where: Pimoroni, official Pi distributors
Power Supply (27W USB-C) – $12
- Official Raspberry Pi 27W power supply
- Don’t skimp here—cheap power = instability
- Must be 27W for Pi 5 (old 15W won’t cut it)
- Where: Official distributors
Cooling – $10
- Official Raspberry Pi Active Cooler
- Small fan + heatsink
- Keeps temps under control during AI processing
- Barely audible (unlike laptop fan)
Case – $8
- Simple plastic case that fits NVMe base
- Protects from dust and accidental bumps
- Ventilation for cooling
- Optional but recommended
Ethernet Cable – Free (had one)
- CAT6 cable for wired connection
- WiFi works, but wired is more reliable
- Especially for 24/7 server
What I Didn’t Need:
- Monitor (headless setup, SSH only)
- Keyboard/mouse (after initial setup)
- HDMI cable (only needed once)
- SD card (booting from NVMe directly)
Optional Upgrades I’m Considering:
- Larger NVMe (512GB) – $50 more
- UPS battery backup – $40
- Better case with better cooling – $20